
How to install Ubuntu Web Remix
Ubuntu Web Remix may be a unique OS that takes the ability offered by Ubuntu and Firefox and creates a replacement, open-source web-based software. This guide will show you the way to line up Ubuntu Web Remix on your computer.
Create an Ubuntu Web Remix USB installer
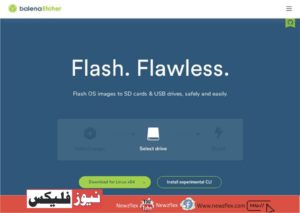
Before installing Ubuntu Web Remix on your computer, you may need a USB installer. Creating a USB installer is simple. To do it, you need to download the Etcher application to your computer, install it, and open it.
You can get your hands on Etcher by heading to the official website. Once on the website, download the program and launch it. Then, head over to the official Ubuntu Web Remix download page and download that too. Open up the Etcher application on your computer. Once it’s open, follow the step-by-step instructions below to induce your Ubuntu Web Remix USB installer found.
Step 1: Find the “Flash from file” button within the Etcher application, and click on that with the mouse. After selecting this button, a pop-up window will appear. Using the pop-up window, browse for the Ubuntu Web Remix ISO file.
Step 2: Insert your USB flash drive into the USB port on your computer. Once your USB flash drive is plugged in, find the “Select target” button and click on that with the mouse. Then, browse your USB flash drive within the Etcher UI and choose it because of the target.
Step 3: Find the “Flash!” button within the Etcher app and click on that with the mouse to burn the Ubuntu Web Remix ISO file to the USB flash drive. confine mind that this process will take it slow.
Step 4: When the burning process is complete, Etcher will validate your USB ISO file. This process will take a pair of seconds, but validation is required. Unplug the USB flash drive, and reboot your computer into your BIOS when the method is finished.
Inside of your computer BIOS, configure it as well from USB in order that the Ubuntu Web Remix OS will be installed on your computer. If you’ve got issues accessing your computer’s BIOS or configuring the BIOS in addition to USB, please consult your computer’s manual.
Installing Ubuntu Web Remix
To install Ubuntu Web Remix on your computer, follow the step-by-step instructions below.
Step 1: Find the “Welcome” page for Ubuntu Web Remix, and choose your preferred language. After selecting the language, find the “Continue” button and move to the following page of the installation tool.
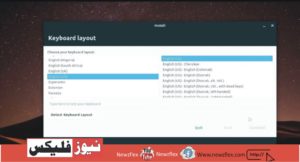
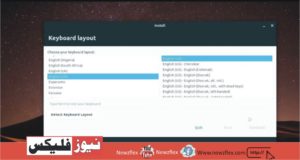
Step 2: After selecting your language on the welcome menu, Ubuntu Web Remix will ask you to settle on your keyboard layout. to pick your language, inspect the list of obtainable languages. Finally, click “Continue.”
Step 3: If you’ve got a WiFi chip inside your desktop or laptop, Ubuntu Web Remix will ask you to attach it to the web. Using the installer UI, choose your WiFi connection, and hook up with the network. Select “Continue” to maneuver to the following page of the installer.
Step 4: you want to now choose the sort of Ubuntu Web Remix installation you like. On the “Updates and other software” page, select either “Normal installation” or “Minimal installation.” afterward, choose your options within the “Other options” area, and click on “Continue” to maneuver to the following page.
Step 5: On the “Installation type” page, select your preferred installation type for Ubuntu Web Remix. For best results, select “Erase disk and install Ubuntu.” When you’ve made your choice, click the “Continue” button.
Step 6: You’ll now have to select it slow zone for Ubuntu Web Remix. to line it slow zone within the Ubuntu Web Remix installation tool, take your mouse and choose where you reside on worldwide map. After choosing where you reside on the map, click on the “Continue” button to maneuver to the subsequent page of the installation tool.
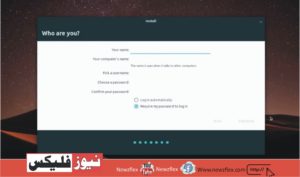
Step 7: Upon selecting its slow zone, you want to configure your username, computer name, and password. Find the text box for “Your name” and enter your full name. After entering your full name, find the “computer’s name” section and enter your computer’s name. the pc name is what other systems will see on the network after they communicate.
Followed by fixing your computer name, you need to enter your user account name and your password. Using the 2 text boxes, enter your password and username. Click “Continue” to maneuver to the subsequent page.
Step 8: When all information is configured, Ubuntu Web Remix will install on your computer. The installation process will take time to complete, so sit back and wait and see.
When the installation process is complete, you’ll see a pop-up message appear on the screen. This pop-up message will allow you to know that you just must reboot your computer to use Ubuntu Web Remix.
یوبنٹو ویب ریمیکس انسٹال کرنے کا طریقہ
یوبنٹو ویب ریمیکس ایک منفرد آپریٹنگ سسٹم ہے جو یوبنٹو اور فائیر فوکس کی طرف سے پیش کردہ طاقت لیتا ہے اور ایک نیا، اوپن سورس ویب پر مبنی آپریٹنگ سسٹم بناتا ہے۔ یہ گائیڈ آپ کو دکھائے گا کہ آپ کے کمپیوٹر پر یوبنٹو ویب ریمیکس کیسے ترتیب دیا جائے۔
یوبنٹو ویب ریمیکس انسٹالر بنائیں
How to install Ubuntu Web Remix
اپنے کمپیوٹر پر یوبنٹو ویب ریمیکس انسٹال کرنے سے پہلے، آپ کو یو ایس بی انسٹالر کی ضرورت ہوگی۔ یو ایس بی انسٹالر بنانا آسان ہے۔ ایسا کرنے کے لیے، آپ کو اپنے کمپیوٹر پر ایچر ایپلیکیشن ڈاؤن لوڈ کرنا، اسے انسٹال کرنا، اور اسے کھولنا چاہیے۔ آپ سرکاری ویب سائٹ پر جا کر ایچر پر ہاتھ اٹھا سکتے ہیں۔ ایک بار ویب سائٹ پر، پروگرام ڈاؤن لوڈ کریں اور اسے شروع کریں. پھر، سرکاری یوبنٹو ویب ریمیکس ڈاؤن لوڈ صفحہ پر جائیں اور اسے بھی ڈاؤن لوڈ کریں۔ اپنے کمپیوٹر پر ایچر ایپلیکیشن کھولیں۔ ایک بار کھلنے کے بعد، اپنے یوبنٹو ویب ریمیکس یو ایس بی انسٹالر کو سیٹ اپ کرنے کے لیے ذیل میں مرحلہ وار ہدایات پر عمل کریں۔
مرحلہ 1:ایچر ایپلیکیشن کے اندر موجود ‘فائل سے فلیش’ بٹن تلاش کریں، اور ماؤس سے اس پر کلک کریں۔ اس بٹن کو منتخب کرنے کے بعد، ایک پاپ اپ ونڈو ظاہر ہوگی۔ پاپ اپ ونڈو کا استعمال کرتے ہوئے، یوبنٹو ویب ریمیکس آئی ایس او فائل کو براؤز کریں۔
مرحلہ 2: اپنے کمپیوٹر پر یو ایس بی پورٹ میں اپنی یو ایس بی فلیش ڈرائیو داخل کریں۔ ایک بار جب آپ کی یو ایس بی فلیش ڈرائیو پلگ ان ہو جائے تو، ‘منتخب ہدف’ بٹن تلاش کریں اور ماؤس کے ساتھ اس پر کلک کریں۔ پھر، ایچر یو آئی میں اپنی یو ایس بی فلیش ڈرائیو کو براؤز کریں اور اسے ہدف کے طور پر منتخب کریں۔
مرحلہ 3: ‘فلیش’ تلاش کریں! ایچر ایپ کے اندر بٹن دبائیں اور یوبنٹو ویب ریمیکس آئی ایس او فائل کو یو ایس بی فلیش ڈرائیو پر جلانے کے لیے ماؤس سے اس پر کلک کریں۔ یاد رہے کہ اس عمل میں کچھ وقت لگے گا۔
مرحلہ 4: جب جلانے کا عمل مکمل ہو جائے گا، ایچر آپ کی یو ایس بی آئی ایس او فائل کی تصدیق کرے گا۔ اس عمل میں چند سیکنڈ لگیں گے، لیکن توثیق کی ضرورت ہے۔ یو ایس بی فلیش ڈرائیو کو ان پلگ کریں، اور عمل مکمل ہونے پر اپنے کمپیوٹر کو اپنے بائیوس میں ریبوٹ کریں۔
یوبنٹو ویب ریمیکس انسٹال کرنا
اپنے کمپیوٹر پر یوبنٹو ویب ریمیکس انسٹال کرنے کے لیے، نیچے دی گئی مرحلہ وار ہدایات پر عمل کریں۔
مرحلہ 1: یوبنٹو ویب ریمیکس کے لیے ‘خوش آمدید’ صفحہ تلاش کریں، اور اپنی پسند کی زبان منتخب کریں۔ زبان کو منتخب کرنے کے بعد، ‘جاری رکھیں’ بٹن تلاش کریں اور انسٹالیشن ٹول کے اگلے صفحے پر جائیں۔

How to install Ubuntu Web Remix
مرحلہ 2: ویلکم مینو پر اپنی زبان منتخب کرنے کے بعد، یوبنٹو ویب ریمیکس آپ سے اپنے کی بورڈ لے آؤٹ کو منتخب کرنے کے لیے کہے گا۔ اپنی زبان منتخب کرنے کے لیے، دستیاب زبانوں کی فہرست دیکھیں۔ آخر میں، ‘جاری رکھیں’ پر کلک کریں۔
How to install Ubuntu Web Remix
مرحلہ 3: اگر آپ کے پاس اپنے ڈیسک ٹاپ یا لیپ ٹاپ کے اندر وائی فائی چپ ہے، تو یوبنٹو ویب ریمیکس آپ سے انٹرنیٹ سے منسلک ہونے کو کہے گا۔ انسٹالر یو آئی کا استعمال کرتے ہوئے، اپنا وائی فائی کنکشن منتخب کریں، اور نیٹ ورک سے جڑیں۔ انسٹالر کے اگلے صفحے پر جانے کے لیے ‘جاری رکھیں’ کو منتخب کریں۔
How to install Ubuntu Web Remix
مرحلہ 4: اب آپ کو یوبنٹو ویب ریمیکس انسٹالیشن کی قسم کا انتخاب کرنا ہوگا جسے آپ ترجیح دیتے ہیں۔ ‘اپ ڈیٹس اور دیگر سافٹ ویئر’ صفحہ پر، یا تو ‘نارمل انسٹالیشن’ یا ‘کم سے کم انسٹالیشن’ کو منتخب کریں۔ اس کے بعد، ‘دیگر اختیارات’ کے علاقے میں اپنے اختیارات کا انتخاب کریں، اور اگلے صفحہ پر جانے کے لیے ‘جاری رکھیں’ پر کلک کریں۔
مرحلہ 5: ‘انسٹالیشن کی قسم’ صفحہ پر، یوبنٹو ویب ریمیکس کے لیے اپنی ترجیحی انسٹالیشن کی قسم منتخب کریں۔ بہترین نتائج کے لیے، ‘ایریز اور یوبنٹو انسٹال کریں’ کو منتخب کریں۔ جب آپ اپنا انتخاب کر لیں تو ‘جاری رکھیں’ بٹن پر کلک کریں۔
مرحلہ 6: اب آپ کو یوبنٹو ویب ریمیکس کے لیے اپنا ٹائم زون منتخب کرنا ہوگا۔ یوبنٹو ویب ریمیکس انسٹالیشن ٹول میں اپنا ٹائم زون سیٹ کرنے کے لیے، اپنا ماؤس لیں اور عالمی نقشے پر آپ کہاں رہتے ہیں اس کا انتخاب کریں۔

How to install Ubuntu Web Remix
مرحلہ 7: اپنا ٹائم زون منتخب کرنے پر، آپ کو اپنا صارف نام، کمپیوٹر کا نام، اور پاس ورڈ کنفیگر کرنا ہوگا۔ ‘آپ کا نام’ کے لیے ٹیکسٹ باکس تلاش کریں اور اپنا پورا نام درج کریں۔اپنا پورا نام درج کرنے کے بعد، ‘کمپیوٹر کا نام’ سیکشن تلاش کریں اور اپنے کمپیوٹر کا نام درج کریں۔ کمپیوٹر کا نام وہ ہے جسے دوسرے سسٹم نیٹ ورک پر دیکھیں گے جب وہ بات چیت کرتے ہیں۔
How to install Ubuntu Web Remix
اپنے کمپیوٹر کا نام ترتیب دینے کے بعد، آپ کو اپنے صارف اکاؤنٹ کا نام اور اپنا پاس ورڈ درج کرنا ہوگا۔ دو ٹیکسٹ بکس کا استعمال کرتے ہوئے، اپنا پاس ورڈ اور صارف نام درج کریں۔ اگلے صفحے پر جانے کے لیے ‘جاری رکھیں’ پر کلک کریں۔
مرحلہ 8: جب تمام معلومات کنفیگر ہو جائیں گی، یوبنٹو ویب ریمیکس آپ کے کمپیوٹر پر انسٹال ہو جائے گا۔ تنصیب کے عمل کو مکمل ہونے میں وقت لگے گا، لہذا آرام سے بیٹھیں اور صبر کریں۔جب انسٹالیشن کا عمل مکمل ہو جائے گا، آپ کو سکرین پر ایک پاپ اپ میسج نظر آئے گا۔ یہ پاپ اپ پیغام آپ کو بتائے گا کہ آپ کو یوبنٹو ویب ریمیکس استعمال کرنے کے لیے اپنے کمپیوٹر کو دوبارہ شروع کرنے کی ضرورت ہے۔

How to install Ubuntu Web Remix