How to Remove Gel Polish: Stop Doing It the Wrong Way
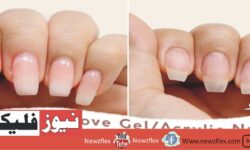
How to Remove Gel Polish: Stop Doing It the Wrong Way Gel polish looks great but removing it can be a nightmare. Many people peel or scrape it off, damaging their nails. If you’ve been removing your gel polish the wrong way, it’s time to challenge that habit. At www.newzflex.com, we believe in doing things differently—let’s expose the hidden truth about how to remove gel polish safely and effectively. Peeling Off Gel Polish Is Damaging Your Nails Have you ever noticed that your nails feel weak, rough, or thin after removing gel polish? That’s because peeling off gel polish damages the top layer of your nails. Most people don’t realize how harmful this can be in the long term. But here’s the good news: there’s a simple solution to remove gel polish without destroying your nails. Let’s dive into the right methods. Gel Polish Can Be Safely Removed at Home Many people believe that gel polish must be removed by a professional. While that’s an option, you can safely do it at home if you follow the right steps. Here’s where we challenge the norm: you don’t need expensive tools or a trip to the salon to remove your gel polish. How to Remove Gel Polish Safely (Step-by-Step) Step 1: Gather Your Supplies You’ll need: Acetone (pure acetone is best) Cotton balls or pads Aluminum foil strips (or use pre-cut nail wraps) Nail file (preferably a fine grit) Cuticle pusher or orange stick Moisturizing lotion or oil Make sure to use pure acetone, not regular nail polish remover. Many people think regular remover works, but it won’t break down the gel polish effectively. Step 2: File the Top Layer Using your nail file, gently file the shiny top layer of the gel polish. You don’t need to press hard—just enough to roughen the surface. This will help the acetone penetrate the gel. Many people skip this step, and that’s why the gel doesn’t come off easily. Don’t rush this part—it’s key to making the rest of the process smoother. Step 3: Soak the Cotton Balls in Acetone Soak each cotton ball in acetone until it’s completely saturated. Be generous with the acetone, as it needs to dissolve the layers of gel polish. A common mistake people make is not using enough acetone. This only leads to frustration and incomplete removal. Step 4: Wrap Your Nails in Foil Place the acetone-soaked cotton ball on each nail and wrap it securely with a piece of aluminium foil. Leave it on for 10-15 minutes. This step is crucial for loosening the gel polish. Skipping this will only make the process more difficult and could lead to damaging your nails when trying to scrape the polish off. Step 5: Check and Push Off the Gel After 15 minutes, check one nail. The gel polish should appear lifted and easy to push off with a cuticle pusher or orange stick. If it’s still sticking, re-wrap the nail and leave it for another 5 minutes. This is where many people make the mistake of scraping too aggressively. If the gel isn’t coming off easily, it’s not ready. Patience is key here. Step 6: Buff and Moisturize Once all the gel is removed, gently buff your nails to smooth out the surface. Then, apply a good moisturizing lotion or nail oil to hydrate your nails and cuticles. Gel polish and acetone can dry out your nails, so it’s important to restore moisture to keep them healthy. Don’t Rush the Process Most people rush through this process, which leads to damaged nails. The hidden truth? Taking your time will save your nails. If you skip steps or don’t use enough acetone, you’ll end up scraping or peeling the gel off, and that’s where the damage happens. At www.newzflex.com, we encourage you to take care of your nails by doing things the right way, not the fast way. Why This Matters Removing gel polish isn’t just about getting rid of colour—it’s about keeping your nails strong and healthy. When you follow these steps, you’re not just saving time and money; you’re also preventing long-term damage. The Bottom Line You don’t need to go to a salon to remove your gel polish safely. With the right tools, the right technique, and a bit of patience, you can protect your nails while keeping them looking great. For more problem-solving beauty tips, visit www.newzflex.com. We’re here to expose the truth and help you make better choices, one article at a time. جیل پالش کیسے ہٹائیں: وہ حقیقت جو کوئی نہیں بتاتا جیل پالش خوبصورت لگتی ہے، لیکن اسے ہٹانا ایک درد سر ہو سکتا ہے۔ بہت سے لوگ اسے کھینچ کر یا کھرچ کر ہٹاتے ہیں، جس سے ان کے ناخن خراب ہو جاتے ہیں۔ اگر آپ نے جیل پالش ہٹانے کا غلط طریقہ اپنا رکھا ہے، تو اب وقت آ گیا ہے کہ اس عادت کو چیلنج کریں۔ www.newzflex.com پر، ہم مختلف طریقے سے چیزیں کرنے پر یقین رکھتے ہیں—چلیے جیل پالش کو محفوظ اور مؤثر طریقے سے ہٹانے کی صحیح طریقہ کار کو جانتے ہیں۔ مسئلہ: جیل پالش کو کھینچنا آپ کے ناخنوں کو نقصان پہنچا رہا ہے کیا آپ نے کبھی محسوس کیا کہ جیل پالش ہٹانے کے بعد آپ کے ناخن کمزور، کھردرے، یا پتلے محسوس ہوتے ہیں؟ یہ اس وجہ سے ہوتا ہے کہ جیل پالش کو کھینچنے سے آپ کے ناخن کی اوپری پرت خراب ہو جاتی ہے۔ زیادہ تر لوگ یہ نہیں سمجھتے کہ یہ لمبے عرصے میں کتنا نقصان دہ ہو سکتا ہے۔ لیکن خوشخبری یہ ہے کہ جیل پالش کو بغیر ناخنوں کو نقصان پہنچائے ہٹانے کا ایک سادہ حل موجود ہے۔ آئیے صحیح طریقے کو جانتے ہیں۔ چھپی ہوئی حقیقت: جیل پالش کو گھر پر محفوظ طریقے سے ہٹایا جا سکتا ہے بہت سے لوگوں کا خیال ہے کہ جیل پالش صرف پروفیشنل کے ذریعے ہی ہٹائی جا سکتی ہے۔ جبکہ یہ ایک آپشن ہے، آپ اسے گھر پر بھی محفوظ طریقے سے ہٹا سکتے ہیں اگر آپ صحیح مراحل پر